In our last BeanShell discussion, we looked at creating your own custom methods for use in JMeter. Today, we will be looking at how you can test your BeanShell scripts before using them in JMeter. BeanShell can be extremely useful in allowing you to harness the power of Java in your scripts. Unfortunately, JMeter provides very little feedback with regards to whether your script works or not. As a result, I want to share one way in which you can debug your scripts and ensure they work before porting them over to JMeter.
Prerequisites:
- A decent editor (I’m using Notepad++)
- The BeanShell jar (bsh)
- JMeter
- Java / JDK
Creating a simple BeanShell script
Let’s begin, first let’s create a very simple BeanShell script. Since BeanShell is loosely typed Java we can create the following method. Note that we don’t have to specify an access level or return type in the method signature.
// File: helloWorld.bsh
helloWorld() {
System.out.println("Hello World!");
}
helloWorld(); // **important ** make sure you actually call the method in the script
Now save that as helloWorld.bsh and keep it safe. I’ve saved it here:
C:Users[username]Desktopbeanshell
Executing our script
Now we want to execute our script but to do this, we need to set our classpath to point to our BeanShell jar. Open up Environment variables. On Windows 7, this can be accessed via
Control Panel -> System -> Advanced System Settings -> Environment Variables
Now click on ‘New..’ in the lower pane to create a new system variable. For variable name, type classpath and for value enter the path to the BeanShell.jar. In my case it was in the same directory as our BeanShell script i.e. C:Users[username]Desktopbeanshellbsh-2.0b4.jar
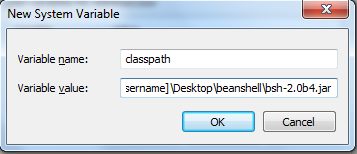
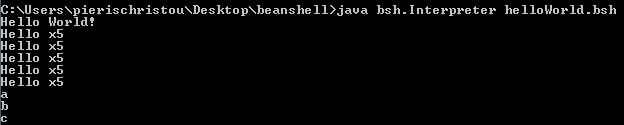
Once that’s complete, we’re ready to execute our script. Fire up cmd (Run->cmd) and navigate to the directory where you’ve saved the BeanShell jar. In here, you want to type java bsh.Interpreter <scriptName.bsh>:
![]()
// File: helloWorld.bshOur script has executed and we’ve printed Hello World to stdout. An expanded version of the script follows:
helloWorld() {
System.out.println("Hello World!");
}
loopTheLoop() {
String[] myStringArray = {"a","b","c"};
for(i=0; i<5; i++)
System.out.println("Hello x5");
for (String s : myStringArray)
System.out.println(s);
}
helloWorld();
loopTheLoop();
Try running this version and you should receive the following output:
Moving to JMeter BeanShell Sampler
Now that we’re sure that our BeanShell script is working locally, we can copy this over to a JMeter BeanShell sampler before simply replacing our System.out.println commands with log.info(“text to output here”); this will result in the following being displayed in the JMeter log:

Note that we could extend upon this example by feeding in our Jmeter array instead of a hardcoded array - String[] myStringArray = {"a","b","c"};
We could do:
loopTheLoopArray() {
// note that in this case our Jm array contains 4 elements - "the","quick","brown","fox"
int count = Integer.parseInt(vars.get("JMeterArr_matchNr")); // get number of arrays (4)
String delimiter = "!"; // create a delimiter between elements allowing for easy splitting later on
StringBuffer sb = new StringBuffer(); // create a new string buffer object to store our array elements
// loop through the Jmeter array
for(int i=1;i<=count;i++)
{
// perform manipulations here
sb.append(vars.get("dayValueX_" + i));
sb.append(delimiter); // place our delimiter after each element
}
vars.put("outputString",sb.toString()); // put our final string in a JMeter variable called 'outputString'
log.info(sb.toString()); // log it to file
}
Looking at our JMeter log file shows that our script works:

Note that the non JMeter version looks as follows:
loopTheLoopArray() {
String[] JmeterArr = {"the","quick","brown","fox"};
String delimiter = "!";
StringBuffer sb = new StringBuffer();
// loop through the Jmeter array
for(int i=0;i<JmeterArr.length;i++)
{
// perform whatever manipulation you want to here
// append each Jmeter array element to the string buffer
sb.append(JmeterArr[i]);
sb.append(delimiter); // place our delimiter after each element
}
System.out.println(sb.toString());
}
loopTheLoopArray();
Important differences to note include:
- JMeter arrays begin from 1 whereas traditional arrays begin from 0. Hence our ‘for loop’ is defined differently in each script. This is important to avoid an out-of-bounds exception.
- Locally we use System.out.println(“text”) to get feedback whereas in JMeter, we use log.info(“text”);
I hope you’ve found this blog insightful.